MIXING TOGETHER ANIMATION AND PHYSICS IN UNITY3D

Have you ever come across questions like:

  • How to make physics and animation work together in Unity3D?
  • How to combine physic movement with animation?
  • How to animate physics?
  • How to physicate animation?

typical questions folks post on forums and get nothing but verbal diarrhea in response

And so on… Gamedev forums are literally flooded with such questions. Well, it means that people deal with it and they have to deal with it. Perhaps, even you had similar situations. And I guess, you found no solution! Perhaps…

Soo, what’s the problem? Shortly: the problem is Unity itself – in 2k19 it still has no apropriate way to combine key-frame animated movement and physically-produced movement. And yes, I’m aware of kinematic (or cinematik) rigid bodies in Unity and ‘Animate Physics’ option in update mode list and so on, but this shit never works or works like a monkey eating its own poop. So, I guess, we need a working tool, which allows to combine animation and physics. I won’t say I’ve invented one, but here’s my approach.

First, we want to be able to have a predefined sequence, where values and other stuff are changed (as we set). For this purpose we can engage Untiy’s animation system, other alternatives are a far more hemorrhoidy. So, we can use the default animation system, but only to modify those values, which are not touched by the physics engine. Second, we can perfrom different tricks on RB component with animation system: we can change rigid body’s mass, its drag coefficient, even set or remove constraints. Sounds neat. However, when we come to changing its position, we would still have nothing to do with it. However, we can do all stuff to other object and somehow link our object to that. For example, we can drive one object with animations and make another object follow it, while being moved by physics forces. Strange, huh? Nope. Ever seen cat being fooled by a laser pointer? I think we can borrow this idea..

Not only funny, but very useful as a concept too

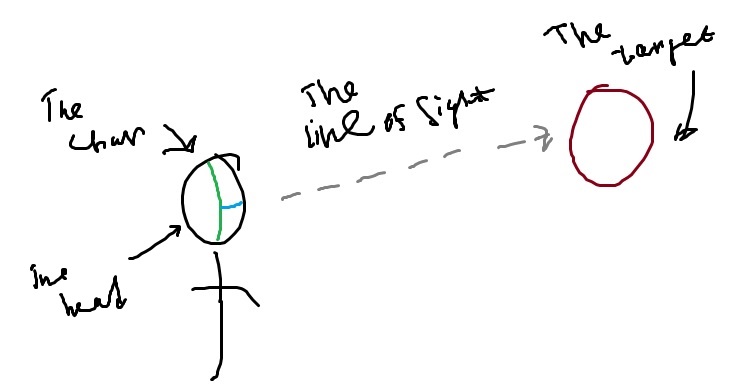
So, basically, we can use some object as a target and another object (which we need to move) will have to move toward this target. This is the easiest case, we’ll only need to know exact distance between an object and the target and then we’ll be able ot apply some amount of force to move the object by this value. Nothing extraordinary here.

Well, here’s my plan…

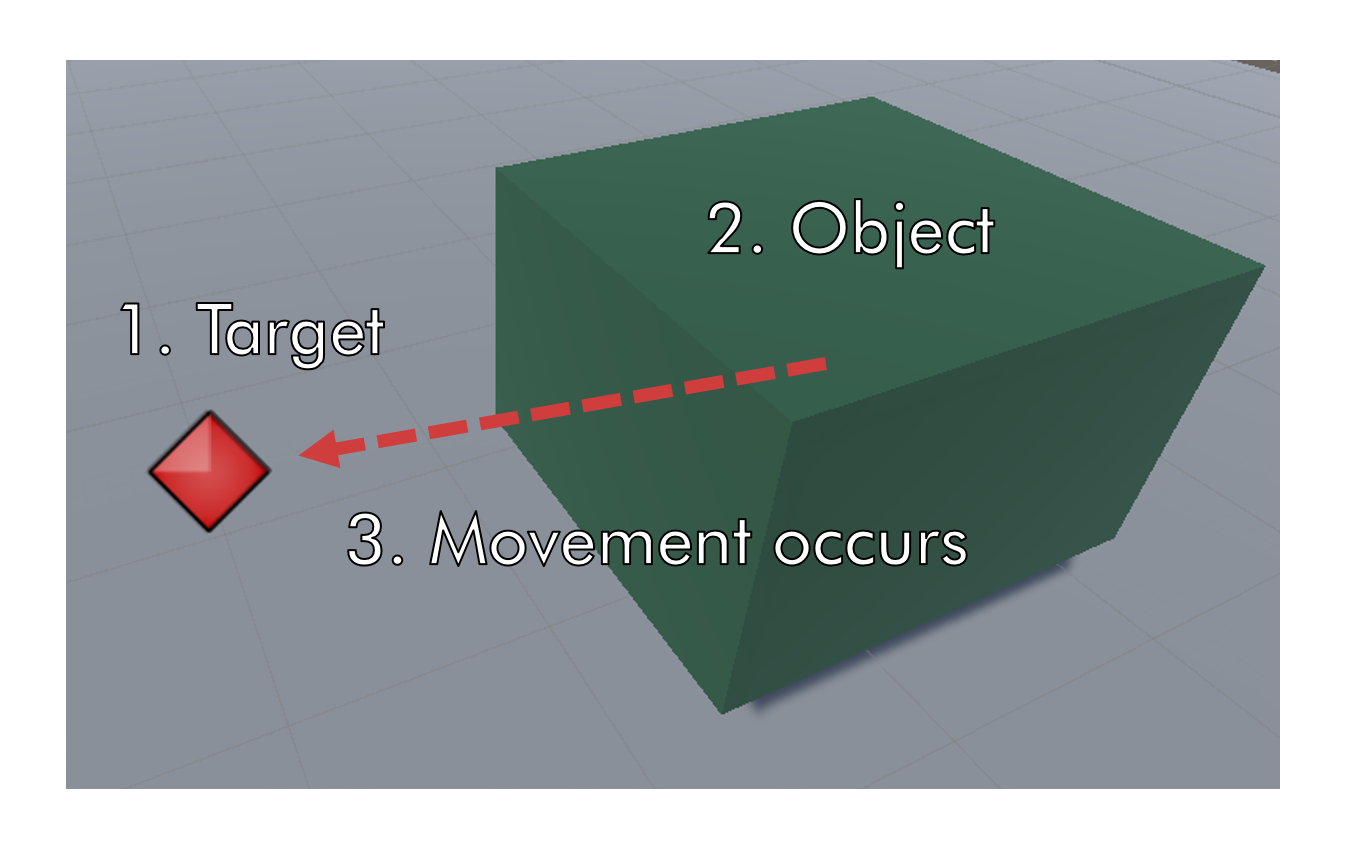
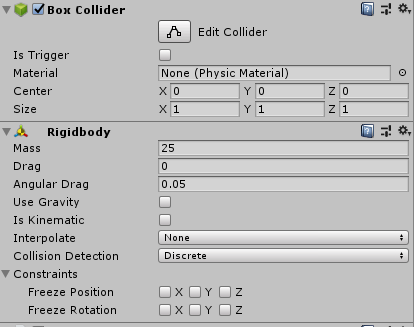
All target’s transformations are performed by an animation sequence. There’s nothing more. Actually, the target is just an empty gameobject with Animatior component attached to it (with coresponding animation sequences). Object’s stuffing looks a bit different. First, the object has a collider and a rigidbody, which allow it to interact in a physically-driven manner. However, it’s not enough. We have to make some custom component (or use existing) to be able to move object. So I made one and called it LBRBPhysFloating.

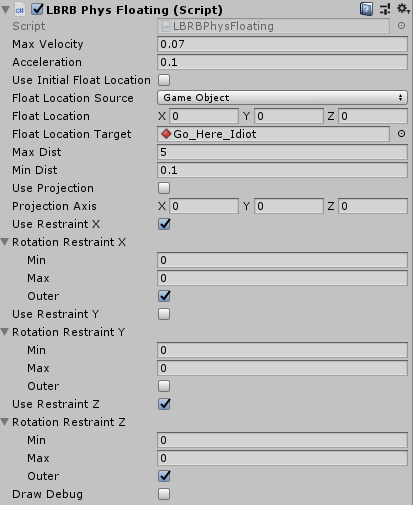
Component layout for the ‘object’

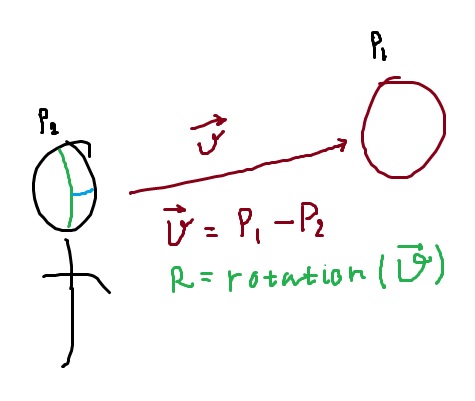
This component may look sophisticated, but all it does is to apply needed amount of forece to the object. The word ‘floating’ stands here for the floating kind of movement, nothing more. Anyways, all the key concepts of this components are the following: we need to find target’s location, and subtract from it our rigidbody’s location, then we need to apply equal amount of force. The corresponding snippet is below, full lisiting is here.

protected void PerformMovement()
{
 Vector3 delta;
 //Get the distance
 delta = GetFloatLocation() - _rigidbody.position;
 //Condition statement is not necessary, AddForce only matters here
 if (delta.magnitude >= 0.1f)
  _rigidbody.AddForce (delta.normalized * Mathf.Clamp (delta.magnitude, 0, MaxVelocity), ForceMode.VelocityChange);
 //This strange conditions are made only to allow object to 'float'
 if (Vector3.Dot(_rigidbody.velocity.normalized, delta.normalized) < 0)
  _rigidbody.AddForce (-_rigidbody.velocity.normalized * Mathf.Clamp 
  (_rigidbody.velocity.magnitude, 0, MaxVelocity), 
  ForceMode.VelocityChange);
}

Basically, you can put any code at the top, but the AddForce procedure should be on its place

Of course, everything should be called from the FixedUpdate procedure. Also, you may want to clarify some things like ForceMode and ForceMode.VelocityChange, which does all the physic-based magic and maybe you would like to learn about all the differences between ForceMode.VelocityChangeand FForceMode.Acceleration. This is explained here.

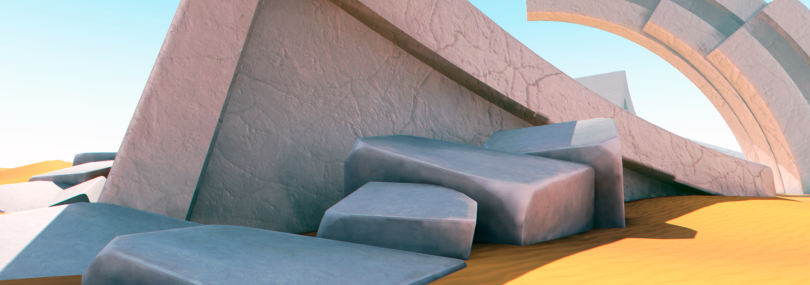
So, what we’ve got? Let’s see. Here I’ve made a simple scene with all necessary content: a green gameobject is our ‘object‘ (the one to move), the red ellipse is our ‘target‘. As I move the target around (in play in editor mode, thanks, Unity), the object follows it. The most important thing here is that the object handles physical interactions with other objects (on the second gif).

So, here it is…

Next important thing is animate the target, so you won’t have to pull it yourself every time of course. In this example I wanted to use a simple, plain, built-in Animator component. Why not? Nothing more, just made a simple trajectory and… And it worked! Yea, it worked nice. I didn’t even expect such a satisfactory result. You can watch the video below to admire.

IMPLEMENTING A COMPLEX BEHAVIOUR SYSTEM IN UNITY3D

Hey. Have you ever tried to develop a complex behaviour system for your project? I mean a system, which provides some really complex functionality, for example, like system that handles character’s actions. Just a bit more complicated stuff than handling the ‘famous triplet’ – actions like run, jump and shoot. Well, tried to (some time ago), but it turned out to be not very successfull. So, I think this time it could be a succsess!

So, why do one need a complex behaviour system in his project? Reasons may be different, but in most cases one needs an integrated solid-working system. Which means that all things should be logically bind to each other and every aspect of a character-world interaction process should be very clear and failsafe. For example, if we have a character, which is able to pick things up (like taking objects from the floor and placing them into inventory) then in most cases we would like to restrict any movement and maybe some other interaction with the environment. Why? Simply because not doing so may cause a lot of bugs, it may ruin the seamlessness of gameplay and so on. Yes, the easiest way is to jumpstart like: I’ll just make some if-statements in the code and everything would work fine. But, no. No, no, no! Nien, nien, nien!!!

Everything just won’t work! Why? Because we obviously have several independent systems working simultaneously: the physics system (that handles movement), the animation system (that handles animation), your gameplay-related system (which handles your items, inventory and so on). Binding them together with several lines of code is just impossible… In may cases. I mean it. You’ll just have to write lines of code to check all conditions such may be the following: if character is moving or not, if item is moving or not, if other animation is playing and so on. Doing this in ‘plain’ and ‘simple’ way would lead to having either overbloated code files or intermixed code (where logically different things mix toghether). And also you’ll be having time debugging that code.

Thus, we have to make some other system, which first handles all other stuff on a lower level of abstraction and only then makes some gameplay-related stuff, which appeares only on higher level of abstraction. There are many models of systems, that can be potentially implemented this way, but in my opinion (and not only mine) the State Machine model would fit best.

I’m aware about tonns of State Machine implementations (a good half of them — in the Asset Store), but most of them are very strange and unconvinient, and the others I just don’t like personnaly. Then I decided to make my owe State Machine-based behaviour system. So, it’s time to invent some bicycle!

The idea is pretty simple: implement a state machine, where each state is an action, transition rules are obviously defined as permissions for each action to be activated or not. However, I decided to make a step away from the classic implementation scheme: I made each state independent with its own transition rules. So, the base class is LBTransitiveAction, which handles all the basic stuff like activating and deactivating itself following predefined transitions (links to other actions). Any action is derived from this basic class, so all the usefull stuff is implemented directly and all low-level stuff is kept in the base class. All actions are stored in a special component – the LBActionManager, which attached to the gameobject (the character).

For example, I made the LBCharacterAnimatedAction, which handles animaions on characters (many actions depend on animations, therefore they are derived from this one). It has only one significant procedure — the ActivateAnimation function, which (obviously) plays the animation from animator. It also checks every tick if the animation has ended or has changed to another in TickActive function, which is called every tick, while the action is active. Also it has a CreateAssetMenu keyword, which allows it to be created in the editor (kind of usefull stuff).

The most interesting thing here is what Unity allows user to make in the editor. Saying shortly: using editor features may either lead to a total mess, or develop an elegant solution. The core idea of my implementation is to make actions availiable at design-time, so the designer could fix existing or create new actions from a certain template. Yes, the word template is the key word here. During design time, you can go to create menue and select some template for a new action and then fill it with exact content like transitions, animations and so on. Finally, you can add this action to an action manager to make it work.

Here’s my character state sheet. Well, a part of it, which defines grounded and airbourne actions, availiable at the moment. As you can see, I’ve made it really fragmented, therefore, there are eight basic actions, which control character ground-air movement. However, most of actions (or states) are instanced from a template. And yes, I haven’t done any real graphical representation of my system (like others’ graphs or visual-programming things or something like this), so, that’s the only thing to view at the moment.

A character state sheet with explanations. However, it’s a pretty old sample, currently, there are some changes and updates in it.

So, the whole thing seems to work. Animations are a bit craggy, also there are some physics bugs (you know they are not rare in Unity). But I’ve played
around with this for some time… And I can say it’s far more better than the previous one. Separate states make the system easier to control and expand, also separation of animation between states makes it smoother, allowing blending and crossfading.

Updates in current project. Transferring to Unity3D. Framework renewal.

Well, it has been some time since the last post here (looks like it has been about a year). So maybe it’s time to make another one, huh? Especially due to some changes in current project. Especially due to amount of such changes.

First of all – the whole project has been transferred to new game engine, «Unity3D». Well, it was a tedious task, which took few months, of course not counted in 9-to-5 days, but it took some time. You may think it’s easy to transfer resources – just copy 3D models, textures, etc into a different folder. Maybe then you’ll even have to place them in some scene and somehow link them together in the editor, but it’s not that hard. Yes, sure, but my project used to have quite a huge amount of resources. However, I managed to perform this task in a couple of days. The most challenging task was to transfer the code. I mean the code. Porting the code in such cases intends a huge amount of work: from updating all calls and all usages of all internal and built-in functions and components to a complete rework of everything. Which path did I choose? I think a middle one. I had some ideas which I wanted to implement, but old version of project’s framework just wasn’t capable of carrying this changes out. Anyway, I had to transfer all the code to C#. So it was a kind of an opportunity to make a clean start, but keeping in mind some well-proven methods. The center idea was to specify the purpose of those blocks called «Mechanism». For example, I decided to make them less universal – to remove all things related to arbitrary data input-output. Also I decided to clarify their cooperation model – to make them explicitly independent or linked together. Describing all innovations here is pointless, but to mention, new project’s framework is now more narrowly-focused, making more use of state machine logic.

Next, it took some time to link it all together. I’ve just imported all the stuff into folders, made a project, a scene, then just placed some stuff in that scene. Well, it wasn’t that hard, I would say it was some kind of fun, but…

Easy as WYSIWYG

But the sad part is that Unity3D is as simple as a pie, but it still doesn’t have some essential built-in things, like material editor (I know there is one at this time, but, damn it’s a piece of crap) or in-game logic editor (like Kismet in UE3). However, there are some solutions available at it’s own store, but some of them are complicated as hell and some of them are piece of crap too. So, setting things together caused a some amount of hemorrhoids. However, making use of my old resources (hi-res meshes and textures) made the scene look quite nice. And with addition of couple of shaders from the store it turned into a somewhat nice scene (virtually as nice as it looked back in UE).

The next task was setting up all game logic. Well, there’s not much from original game logic in the project at the moment, but at least we can test the new character system from my ‘new’ framework. Setting up complex things like characters in Unity3D is somewhat an interesting task: Unity has built-in component system, which allows you to build everything from scratch just by adding right components to your blank object (as far as I know, it’s called component object model). Currently, there are dozens of them in Unity: rendering components (they make stuff appear on the screen), physics and movement components (they make stuff move all around), some utilities and, finally, custom components. So, adding mesh to your object (or character) is easy – you just have to add a MeshRenderer and MeshFilter components. But making any other stuff like movement or interaction causes some haemorrhoid: you have to write your own scripts, which are attached as components to your object. Lucky me, ’cause I know how to handle scripts and all the ‘code’ stuff, poor you if you don’t.

So, the character is processed by a custom component which holds all available actions, such as moving, jumping and all other characters’ stuff. Those actions are not components, neither they are added directly to the playable object, they are independent pre-set resources which are processed by the master component (which is added to the object).  Just for test purposes I’ve added only movement mechanics to the character (previously imported xenowalker character). Well, it worked – we can move around with our character: we can run, jump and fall with appropriate animations being played.

Oh, sure that wasn’t that simple as drag-and-drop stuff. As I said earlier, I spent several months debugging this system to make it work. Crap, crap, crap, it wasn’t easy’n’simple at all! Only then I could use this custom component. But for now I think the framework has reached some ‘point of stability’ which means I’ve done with all the basic stuff (basic action performance, transition between action, etc) and I can now focus on producing more complex real game logic.

Also, unity editor is quite permissive in things you can do in it’s edit mode or in it’s play-in-editor mode. For example, you are free to playa around with any values in your object’s components’ fields. Or, if you already have some working game logic, you can test it any way you want it. Yea, I found it quite fun to play with.

Play around with all things in real time? Easy as a pie. Literally – P-I-E (play in editor)

And, finally, a couple of word about graphics. As we can see, everything is looking not that bad – there are baked shadows, indirect lighting, reflections, even subsurface-scattered materials in the scene. However, not all of this stuff is essentially provided by Unity.

For example, I used legacy 3d models and textures (contents of the project), also I took skin shader from the store (it’s free, however), and, of course, I used my own game logics (the framework). For example, if I would start everything from scratch (with only basic knowledge in game development), it would be a total hemorrhoids: I would have to plan and build my framework in terms of component object model (it’s not very close to object-oriented model we normally use), I would have to make my own scripts for all basic stuff (movement, interaction, player controls, etc), I would even have to write my own shader programms (oh, it’s a lot of pain). It’s not that simple, I guess. Or I just could use some ready-to-go solutions (tonns of them in the store). Honestly, I tried to use some frameworks like ‘racing game kit’ or ‘3rd person basic framework’. What can I say? They’re not working! At least those so-called frameworks or kits. Okay, maybe they are not working as I want them to work: they are not flexible at all, they are not universal, they have strange structure (often illogical), they are hard to study after all (so few documentation). For example, one of those ‘fast character kits’ asks your characters to have specific bone hierarchy, and another asks your characters to have a special foot placement. What? Well, that’s ridiculous, at least, in my case. However, there are some ready-to-use 3d models, textures and animations (even complete characters)  in the store which often comply with these demands. But really, why it’s so hard to put all this things together and make them work?! Maybe just because all this things were made by different people in different time with different ideas in their heads.

So, finally, the only thing I’ve imported from the store is that cool subsurface-scattered shader – I used it on the character. I really enjoy it, just look at that shadows and that glowiness, it really looks like world-space subsurface scattering.

To conclude, here is my personal opinion about Unity3D.

Warning, butthurt alert!

Good sides are:

  • Unity itself is small and compact, runs even on a calculator;
  • It allows to make logically-structured projects, makes good use of folders;
  • It has a liberal debugging scheme: debug every aspect, debug scene, debug code, debug in real time, debug in IDE, debug in an old-school-style with all that logs;
  • It is based on .Net Framework with all its powers and dark magic;

Bad sides are:

  • No matter what you say, it’s hard as hell to start from scratch;
  • Unity is full of bicycles, literally – f-u-l-l o-f b-i-c-y-c-l-e-s;
  • There are some ready-to-use bicycles, but you can’t always use them (at least all together);
  • Good graphics level is hard to achieve, it goes too flexible here;
  • Horrible situation with some WYSIWYG-must-haves like material editor
  • Updating every damn second (some of my code parts have already outdated);
  • I’m still searching for a good code explorer (like UnCodeX), I don’t like VS’s tools.

However, transferring is now complete and there is no way back.

Inventing a bicycle or implementing a friendly head rotation system for game characters

It has been a long time since any serious programming challenge. And here it is! Just started some research on bone rotation in characters’ meshes and found out that the built-in system is.. Well… Not so friendly and not so easy to use. So here’s another challenge: make a friendly, easy to use bone rotation system within LBTechnology. Of course, I’ve been doing stuff like this before, and I know ‘the shit’, but well I’ve never programmed bone rotation system ‘from scratch’. And I just didn’t know it would be that challenging. Also I’ve been aware of the trickiness of such systems from them games, which do implement such systems – i.e. famous Mass-Effect and Fallout spinning heads. But you know, you don’t know something until you try it yourself. But I’m not them Bioware nor Bethesda – I’ve got plenty of time and plenty of dope to study the problem thoroughly and no project-master whipping my ass each time I do wrong.

So, what do we basically need to implement the head-facing-target system? Well: the character having its mesh with a needed bone, the target and some code. So we’ve got the char, the target, the only thing we need – is the code, which rotates the head to face the target.

tech_task
A technical task for this problem

Well, the first and the most obvious and, perhaps, the only solution is to take the distance between the target and the head formula_v_calc, get its normal, formula_v_modulo, somehow turn it into rotation formula_rotation and set this value to the head. Looks quite easy to implement with modern game development tools.

solution
A basic solution for this problem

Ha-ha, not that easy! Far not that easy! A plenty of problems await here, of course depending on the tool you’re using.

Problem number one, coordinatie transforms. This is the first thing you’ll encounter. For example, you’ve just calculated the formula_R_value value and you’re looking at the result… And the result seems to frustrate you! Really, the bone can twist any direction except the correct! Why does it happen? Simply because you’re setting the values in world coordinates. The bone may have its own coordinate basis or it may be using it’s parent bone’s coordinates or anything else like this. So, the first thing, you should take into account is coordinate transforms from world to local for the rotating bone. My solution of this problem is to go ‘the hard way’ – this means not to use any advanced math, just transform the axis based on a pre-set rule. I called this procedure Rotation Resolving (not yet copyrighted, I hope) based on some specialized structures – Rotation Resolvers. You just point each axis, from where to get its value – i.e [Yaw-Pitch, Pitch-Roll, Roll-Yaw]. This functionality was implemented in LBSkeletalMeshControlMechanism.

Code solving problem one
...

enum RotatorAxis
{
    RotatorAxis_Yaw,
    RotatorAxis_Pitch,
    RotatorAxis_Roll,
};

struct RotatorResolver
{
    var() RotatorAxis GetYawFrom;
    var() bool bInvertYaw;
    var() RotatorAxis GetPitchFrom;
    var() bool bInvertPitch;
    var() RotatorAxis GetRollFrom;
    var() bool bInvertRoll;
};

...

function rotator ResolveRotator(rotator r, RotatorResolver resolver)
{
    local rotator res;
    
    res.Yaw=ResolveRotatorAxis(r,resolver.GetYawFrom,resolver.bInvertYaw);
    res.Pitch=ResolveRotatorAxis(r,resolver.GetPitchFrom,resolver.bInvertPitch);
    res.Roll=ResolveRotatorAxis(r,resolver.GetRollFrom,resolver.bInvertRoll);
        
    return res;
}

...

function int ResolveRotatorAxis(rotator r, RotatorAxis axis, optional bool binvert = false)
{
    if (axis==RotatorAxis_Yaw)   
    {
        if (!binvert) 
            return r.Yaw;
        else
            return -r.Yaw;
    }
    else if (axis==RotatorAxis_Pitch)
    {
        if (!binvert) 
            return r.Pitch;
        else
            return -r.Pitch;
    }
    else if (axis==RotatorAxis_Roll)
    {
        if (!binvert) 
            return r.Roll;
        else
            return -r.Roll;
    }
}

...

Problem number two, rotation restraints. This is the second thing you’ll encounter. Afer all that coordinate transform troubles you’ll finally be able to set corresponding rotation values to the rotating bone. But your character’s head would spin around its neck like it’s not attached to it. And this result will frustrate you too! Because it does look strange and funny. Well, only birds can spin their heads more than 180°, but even they’re not able to make a 360° twist (but it seems like they can, anyway I don’t care).

voa1pp
A GIF from the internet

Therefore, you’ll need to limit the available angle of rotation for each rotation axis. The most obvious solution here is to clamp your desired angle, formula_a between this axis restraints formula_a1 and formula_a2 , so you’ll get your angle like formula_clamp_2.

angle_clamps

But this solution has on big drawback – sometimes you get wrong results. For example, if your angle uses formula_deg_forma_1 format, you’ll get some trouble trying to limit the rotation from 330° to 30°. The best solution in my opinion is to use the formula_deg_forma_2 format, especially if it runs up to infinity (both infinities), otherwise you’ll get troubles with cycle transition from 180° to -180° (just like me). But my solution of this problem is to go ‘the hard way’, it’s nothing that special except the ClampRotatorAxis function, which is… Well, just lol. Anyway, I’ve implemented a function, which clamps one axis, and a function, which clamps all three rotation axes. This functionality was implemented in LBBoneRotationMechanism.

Code solving problem two
...

function int ClampRotatorAxis(int axisvalue, int min, int max)
{
    local int r,f1,f2;
    
    f1=NormalizeRotAxis(min);
    f2=NormalizeRotAxis(max);
    
    r=NormalizeRotAxis(axisvalue);
    
    if (0<=f1*unrrottodeg && f1*unrrottodeg<=180)
    {
        if (0<=f2*unrrottodeg && f2*unrrottodeg<=180)
        {
            if (0< r+(-f2))    
                    r=f1; 
                else 
                    r=f2;    
            }
        }   
    }   
    
    return r;  
}

...

function rotator ClampRotator(rotator r, optional bool bClampYaw=false, optional int Yawf1=0, optional int Yawf2=0, optional bool bClampPitch=false, optional int Pitchf1=0, optional int Pitchf2=0,
optional bool bClampRoll=false, optional int Rollf1=0, optional int Rollf2=0)
{   
    local rotator res;
    
    if (bClampYaw)
        res.Yaw=ClampRotatorAxis(r.Yaw,Yawf1,Yawf2);
        
    if (bClampPitch)
        res.Pitch=ClampRotatorAxis(r.Pitch,Pitchf1,Pitchf2); 
     
    if (bClampRoll)
        res.Roll=ClampRotatorAxis(r.Roll,Rollf1,Rollf2);  

    return res;    
}

...

Problem number three, smooth movement. This is the third thing you’ll encounter, possibly. Setting the values even if they are axis-transformed and clamped causes your character’s head to rotate as fast as it is possible. For example, if the target teleports – your char’s head will instantly (in one frame) turn there. It looks very strange, sometimes even scares the crap outta player. Sometimes this problem is not actual, but for my case it is important to solve it (just because there are some objects that can teleport). So, what is the solution? It’s quite simple: we don’t set the exact rotation on each frame, we remember this value in one of our variables (a TargetRotation variable) and increase our head’s rotation each frame until we reach this value (using some kind of interpolation if you’re a math dude). Nothing special, but there is still a lot of problems here as we deal with cyclic values – the formula_deg_forma_2 form of degree value. My solution is just as described – increasing the real rotation with certain speed until it reaches the needed value. Well, I just used the linear interpolation formula to get the value for each tick, it works fine for some reason (except that case with cycle transition from 180° to -180°), but I’ll be making a new interpolation function anyway soon. This functionality was  also implemented in LBBoneRotationMechanism.

Code solving problem three
...

function float RotateYaw(float dt)
{
    local float crot,trot,rrot;
    
    trot=NormalizeRotAxis(GetTargetRotation().Yaw);

    crot=NormalizeRotAxis(currot.Yaw);   
    
    if (bSmoothRotation)
        rrot=LinearInerpFloatValue(crot*unrrottodeg,trot*unrrottodeg,TickIndependentFloat(AngularSpeed,dt,RotationTimeScale),dt)*degtounrrot;
    else
        rrot=trot;
        
    return rrot;   
}

...

function float LinearInerpFloatValue(float current, float target, float step, float dt)
{
    local float value;
    
    if (abs(current - target) > abs(step))
    {
        if (current < target)
            value=current+abs(step); 
        else
            value=current-abs(step);   
    }
    else
    {
        if (current < target)
            value=current+abs(current - target); 
        else
            value=current-abs(current - target);      
    }
        
     return value;
}

...

And, finally, there’s the result after long time spent debugging. Well, it was rough, even for me. Also I’ve included several additional features – a hard-align (always try to look at the target) and soft-align (look at the target only when the angle is inside them restraints), a Look-At-Point and Look-At-Actor modes, which can become quite handy for mechanism interactions.

Also, there’s a video with a complete demonstration of this system:

EVEN MORE STRANGE RUINS IN THE DESERT AND THE BLOCKTOBER

Recently I’ve been working on some updates for one of the new levels from the project «A Dream In The Fall». What happened? Well, I Just made basic geometry smoother and the whole level changed beyond recognition. Not much progress though — the sand still looks crappy and the lighting is out of order at all. But I’m on my way to fix it!

Actually it’s not true, because I seem to be one of that dudes, who do things and only then think (best case scenario), so everything resulted in a complete rework of everything from scratch including element locations, paths, triggers and other important stuff. And yes, I’m still not satisfied with the result! Well, I’m doing such updates with almost every asset, and this iterative refienment proceess seems to stop at never. What is the problem here? Just only total time spent? Well, while I’ve been working in this industry, I’ve seen some dudes being planning, projecting, constructing in the paper each damn level before making it in the editor. It took hours, days, months and the result was still a piece of guano (wild animals’ shit). Also there are some examples from big guys in modern industry making #blocktober flashmob, demonstraiting their pedantic approach to level design. Oh, come on, that just thier work for bread ‘n’ butter. What I do — is a total random-driven process! Once I’ve worked with random level generators, you know what — I’m one of them random generators.

Just made several assets (stone slabs or whatever), took them each in the hand and started dropping them in this hot low-polygonal sand. And, of course, the most important hemorrhoids here is collision models on these meshes. Well, I’ve managed to solve it — just puth everything in blocking volumes, lol. Well, that’s all about this short story of making shit even shittier, but removing some shit from this shit on each iteration.