It has been a long time since any serious programming challenge. And here it is! Just started some research on bone rotation in characters’ meshes and found out that the built-in system is.. Well… Not so friendly and not so easy to use. So here’s another challenge: make a friendly, easy to use bone rotation system within LBTechnology. Of course, I’ve been doing stuff like this before, and I know ‘the shit’, but well I’ve never programmed bone rotation system ‘from scratch’. And I just didn’t know it would be that challenging. Also I’ve been aware of the trickiness of such systems from them games, which do implement such systems – i.e. famous Mass-Effect and Fallout spinning heads. But you know, you don’t know something until you try it yourself. But I’m not them Bioware nor Bethesda – I’ve got plenty of time and plenty of dope to study the problem thoroughly and no project-master whipping my ass each time I do wrong.


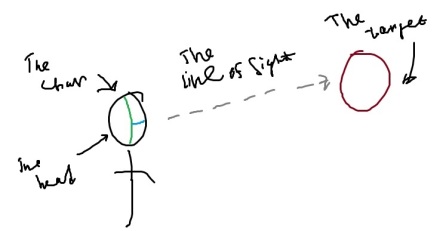
So, what do we basically need to implement the head-facing-target system? Well: the character having its mesh with a needed bone, the target and some code. So we’ve got the char, the target, the only thing we need – is the code, which rotates the head to face the target.
Well, the first and the most obvious and, perhaps, the only solution is to take the distance between the target and the head  , get its normal,
  , somehow turn it into rotation
  and set this value to the head. Looks quite easy to implement with modern game development tools.

Ha-ha, not that easy! Far not that easy! A plenty of problems await here, of course depending on the tool you’re using.
Problem number one, coordinatie transforms. This is the first thing you’ll encounter. For example, you’ve just calculated the  value and you’re looking at the result… And the result seems to frustrate you! Really, the bone can twist any direction except the correct! Why does it happen? Simply because you’re setting the values in world coordinates. The bone may have its own coordinate basis or it may be using it’s parent bone’s coordinates or anything else like this. So, the first thing, you should take into account is coordinate transforms from world to local for the rotating bone. My solution of this problem is to go ‘the hard way’ – this means not to use any advanced math, just transform the axis based on a pre-set rule. I called this procedure Rotation Resolving (not yet copyrighted, I hope) based on some specialized structures – Rotation Resolvers. You just point each axis, from where to get its value – i.e [Yaw-Pitch, Pitch-Roll, Roll-Yaw]. This functionality was implemented in LBSkeletalMeshControlMechanism.
Code solving problem one
...

enum RotatorAxis
{
    RotatorAxis_Yaw,
    RotatorAxis_Pitch,
    RotatorAxis_Roll,
};

struct RotatorResolver
{
    var() RotatorAxis GetYawFrom;
    var() bool bInvertYaw;
    var() RotatorAxis GetPitchFrom;
    var() bool bInvertPitch;
    var() RotatorAxis GetRollFrom;
    var() bool bInvertRoll;
};

...

function rotator ResolveRotator(rotator r, RotatorResolver resolver)
{
    local rotator res;

    res.Yaw=ResolveRotatorAxis(r,resolver.GetYawFrom,resolver.bInvertYaw);
    res.Pitch=ResolveRotatorAxis(r,resolver.GetPitchFrom,resolver.bInvertPitch);
    res.Roll=ResolveRotatorAxis(r,resolver.GetRollFrom,resolver.bInvertRoll);

    return res;
}

...

function int ResolveRotatorAxis(rotator r, RotatorAxis axis, optional bool binvert = false)
{
    if (axis==RotatorAxis_Yaw)
    {
        if (!binvert)
            return r.Yaw;
        else
            return -r.Yaw;
    }
    else if (axis==RotatorAxis_Pitch)
    {
        if (!binvert)
            return r.Pitch;
        else
            return -r.Pitch;
    }
    else if (axis==RotatorAxis_Roll)
    {
        if (!binvert)
            return r.Roll;
        else
            return -r.Roll;
    }
}

...
Problem number two, rotation restraints. This is the second thing you’ll encounter. Afer all that coordinate transform troubles you’ll finally be able to set corresponding rotation values to the rotating bone. But your character’s head would spin around its neck like it’s not attached to it. And this result will frustrate you too! Because it does look strange and funny. Well, only birds can spin their heads more than 180°, but even they’re not able to make a 360° twist (but it seems like they can, anyway I don’t care).

Therefore, you’ll need to limit the available angle of rotation for each rotation axis. The most obvious solution here is to clamp your desired angle,  between this axis restraints
  and
and  , so you’ll get your angle like
  .
.

But this solution has on big drawback – sometimes you get wrong results. For example, if your angle uses  format, you’ll get some trouble trying to limit the rotation from 330° to 30°. The best solution in my opinion is to use the
  format, especially if it runs up to infinity (both infinities), otherwise you’ll get troubles with cycle transition from 180° to -180° (just like me). But my solution of this problem is to go ‘the hard way’, it’s nothing that special except the ClampRotatorAxis function, which is… Well, just lol. Anyway, I’ve implemented a function, which clamps one axis, and a function, which clamps all three rotation axes. This functionality was implemented in LBBoneRotationMechanism.
Code solving problem two
...

function int ClampRotatorAxis(int axisvalue, int min, int max)
{
    local int r,f1,f2;

    f1=NormalizeRotAxis(min);
    f2=NormalizeRotAxis(max);

    r=NormalizeRotAxis(axisvalue);

    if (0<=f1*unrrottodeg && f1*unrrottodeg<=180)
    {
        if (0<=f2*unrrottodeg && f2*unrrottodeg<=180)
        {
            if (0< r+(-f2))
                    r=f1;
                else
                    r=f2;
            }
        }
    }

    return r;
}

...

function rotator ClampRotator(rotator r, optional bool bClampYaw=false, optional int Yawf1=0, optional int Yawf2=0, optional bool bClampPitch=false, optional int Pitchf1=0, optional int Pitchf2=0,
optional bool bClampRoll=false, optional int Rollf1=0, optional int Rollf2=0)
{
    local rotator res;

    if (bClampYaw)
        res.Yaw=ClampRotatorAxis(r.Yaw,Yawf1,Yawf2);

    if (bClampPitch)
        res.Pitch=ClampRotatorAxis(r.Pitch,Pitchf1,Pitchf2);

    if (bClampRoll)
        res.Roll=ClampRotatorAxis(r.Roll,Rollf1,Rollf2);

    return res;
}

...
Problem number three, smooth movement. This is the third thing you’ll encounter, possibly. Setting the values even if they are axis-transformed and clamped causes your character’s head to rotate as fast as it is possible. For example, if the target teleports – your char’s head will instantly (in one frame) turn there. It looks very strange, sometimes even scares the crap outta player. Sometimes this problem is not actual, but for my case it is important to solve it (just because there are some objects that can teleport). So, what is the solution? It’s quite simple: we don’t set the exact rotation on each frame, we remember this value in one of our variables (a TargetRotation variable) and increase our head’s rotation each frame until we reach this value (using some kind of interpolation if you’re a math dude). Nothing special, but there is still a lot of problems here as we deal with cyclic values – the form of degree value. My solution is just as described – increasing the real rotation with certain speed until it reaches the needed value. Well, I just used the linear interpolation formula to get the value for each tick, it works fine for some reason (except that case with cycle transition from 180° to -180°), but I’ll be making a new interpolation function anyway soon. This functionality was also implemented in LBBoneRotationMechanism.
Code solving problem three
...

function float RotateYaw(float dt)
{
    local float crot,trot,rrot;

    trot=NormalizeRotAxis(GetTargetRotation().Yaw);

    crot=NormalizeRotAxis(currot.Yaw);

    if (bSmoothRotation)
        rrot=LinearInerpFloatValue(crot*unrrottodeg,trot*unrrottodeg,TickIndependentFloat(AngularSpeed,dt,RotationTimeScale),dt)*degtounrrot;
    else
        rrot=trot;

    return rrot;
}

...

function float LinearInerpFloatValue(float current, float target, float step, float dt)
{
    local float value;

    if (abs(current - target) > abs(step))
    {
        if (current < target)
            value=current+abs(step);
        else
            value=current-abs(step);
    }
    else
    {
        if (current < target)
            value=current+abs(current - target);
        else
            value=current-abs(current - target);
    }

     return value;
}

...
And, finally, there’s the result after long time spent debugging. Well, it was rough, even for me. Also I’ve included several additional features – a hard-align (always try to look at the target) and soft-align (look at the target only when the angle is inside them restraints), a Look-At-Point and Look-At-Actor modes, which can become quite handy for mechanism interactions.


Also, there’s a video with a complete demonstration of this system: